Update 04/04/2019: I have completed the FREE course: “Why you need serverless microservices, yesterday!“. Let me know what you think.
Background
Design patterns in software development are an essential tool to excellent software creation. Being able to identify patterns while observing source code, is an essential skill that is acquired over a period of years of object oriented software development practices. Over the years, I’ve seen patterns being implemented that only have the name of the pattern in file names but hardly represent the actual pattern the way they were intended to be used. Also, I have seen state machines being used instead of state design patterns at the costs of horribly complicated software that is hard to maintain. There is no reason to use state machines anymore when you are using an object oriented programming language.
One of the best sources about software design patterns is the “Design Patterns: Elements of Reusable Object-Oriented Software” book by the Gang of Four. Still, it is the bible of design patterns after all these years. There are many other sources and books but the blue book by the Gang of Four is the fundamental one that all seasoned architects and developers should have mastered.
Design patterns are programming language neutral. What they convey and solve are concepts that can be applied in any object oriented programming language such as C#, C++, Delphi, Java, Objective-C, etc. It is these concepts that one should master. Once the concepts are mastered, it is fairly straightforward to identify opportunities to use and apply them. At that point, it is simply a matter of language syntax.
In this article, I will discuss the State Design Pattern. I will discuss the state design pattern on how it can be used in a fairly complex scenario and demonstrating this with sample C# code. I will also discuss using the state design pattern instead of using a state machine. I will not go into the details of how to create state machines, rather I will concentrate on the much more modern State Design Pattern. I picked a complex scenario because I believe that a more complex scenario can teach several things at once. It will demonstrate the combination of different scenarios and answer more questions this way.
The State Design Pattern:
I would summarize the State Design Pattern as follows:
“The state design pattern allows for full encapsulation of an unlimited number of states on a context for easy maintenance and flexibility.”
From a business side of things, this is worth a lot of money. There is no reason anymore NOT to use the state design pattern even in very simple state scenarios. You can get rid of switch statements (C#), for example. It buys you flexibility because you won’t be able to predict the future and requirements changes (I’m pretty sure about that).
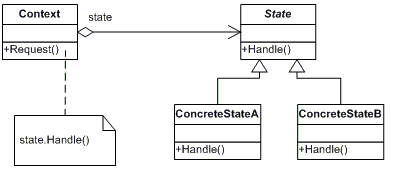
The State Design Pattern allows the context (the object that has a certain state) to behave differently based on the currently active ConcreteState instance.
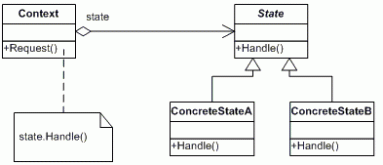
Let’s take a closer look into the parts that make up the state design pattern.
Context Object
Context is an instance of a class that owns (contains) the state. The context is an object that represents a thing that can have more than one state. In fact, it could have many different states. There is really no limit. It is perfectly fine to have many possible state objects even into the hundreds. It is coming to have context objects with only a handful of possible states, though.
The context object has at least one method to process requests and passes these requests along to the state objects for processing. The context has no clue on what the possible states are. The context must not be aware of the meaning of these different states. It is important that the context object does not do any manipulation of the states (no state changes). The only exception is that the context may set an initial state at startup and therefore must be aware of the existence of that initial state. This initial state can be set in code or come from an external configuration.
The only concern that the context has is to pass the request to the underlying state object for processing. The big advantage of not knowing what states the context could be in is that you can add as many new states as required over time. This makes maintaining the context super simple and super flexible. A true time saver and a step closer to being rich beyond your wildest dreams (almost).
State
The state class is an abstract class. It is usually an abstract class and not an interface (IInterface). This class is the base class for all possible states. The reason why this class is usually an abstract class and not an interface is because there are usually common actions required to apply to all states. These global methods can be implemented in this base class. Since you can’t do any implementation in Interfaces, abstract classes are perfect for this. Even if you do not have any initial global base methods, use abstract classes anyways because you never know if you might need base methods later on.
The State class defines all possible method signatures that all states must implement. This is extremely important to keep the maintenance of all possible states as simple as possible. Since all states will implement these methods signatures and if you forget to implement a new method, the compiler will warn you at compile time. An awesome safety net.
ConcreteState
The ConcreteState object implements the actual state behavior for the context object. It inherits from the base State class. The ConcreteState class must implement all methods from the abstract base class State.
The ConcreteState object has all the business knowledge required to make decisions about its state behavior. It makes decisions on when and how it should switch from one state to another. It has knowledge of other possible ConcreteState objects so that it can switch to another state if required.
The ConcreteState object can even check other context objects and their states to make business decisions. Many times, an object may have more than one context object. When this happens, a ConcreteState object may need to access these different states and make a decision based on active states. This allows for complicated scenarios but fairly easy to implement using the state design pattern. You will see an example later in this article that shows multiple context objects and their states and the need to work together.
The ConcreteState object also is capable of handling before and after transitioning to states. Being aware of a transition about to happen is an extremely powerful feature. For example, this can be used for logging, audit recording, security, firing off external services, kicking of workflows, etc. and many other purposes.
The ConcreteState object allows the full use of a programming language when compared to state machines. Nothing is more powerful in abstract logic and conditionals coupled with object orientation as a computer programming language compared to state machines and their implementations.
As you add new methods to the abstract base class over time, each ConcreteState class will need to implement that method. This forces you to think from the point of view of the current state.
“How should state ConcreteStateA react when this method is called?”
As you implement the behavior for a method, you can be rest assured that this is the only place in the entire system that will handle this request when ConcreteStateA is the active state. You know exactly where to go to maintain that code. Maintainability is king in software development.
Summary
To summarize, you will need a context and a few states that ideally derive from an abstract base class to create a flexible state solution. If you got switch statements or a lot of If statements in your code, you got opportunities to simplify by using the state design pattern. If you are using state machines, you got an awesome opportunity to simplify your code and safe time & money. Just do it!
Example
The example I created demonstrates the use of the State Design Pattern and how it can be used with multiple context objects working together. It is a fictitious hardware device with a door.
The device can be powered on or off. Specifically, the device has an operations mode that can be in the following states:
- Idle
- Busy
- Powering Down
- Powering Up
The door represents a physical door on the device. The door can be in the following states:
- Opened
- Closed
- Locked
- Unlocked
- Broken
To make it a little more complicated, the device can be in different hardware configurations. These configurations can be changed at run-time of the device. The following configurations are available:
- Production Configuration
- Test Configuration
The operation of the device depends on the different individual states as well as a combination of the states listed above. The more combinations that are possible, the more complicated it would be to maintain this using traditional Switch or If statements. You could use a state machine as well but it will not buy you the flexibility and ease of use when compared to the state design pattern. Feel free to add brand-new states and try to experiment with it.
Breaking it Up
No matter how complicated software projects are, the way to tackle them successfully is to break them up. This is especially true in object oriented software development. Breaking things up into smaller, manageable pieces allows a focused effort in understanding the problem domain. It is coming to zoom into the smaller parts and then zoom back out again to a 10,000 foot view and vice versa. You do this many times. Look at the big picture, then break up the picture into smaller parts, look at the smaller part and so forth. Object orientation is a natural fit to model real-life scenarios that contain things, people, processes and their behaviors to interact with each other.
Let’s break up the things that we do know in this example. It looks like we have 3 things:
- Device
- Door
- Configurations
Behavior
It is important to recognize that there is most likely a certain behavior between these things. This behavior is probably driven by certain business or operational rules. The power of object orientation is being able to capture this behavior inside classes. Since an object generally consists of roughly 50% data and 50% behavior, we must take care of the behavior part of objects. Over time, this behavior might change because requirements may have changed. Again, this is where object orientation shines when it is done correctly.
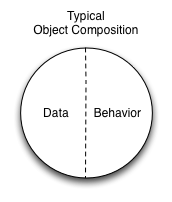
So, we can assume that Device is on its own. It represents a physical device from the real world. The door is part of the device and can’t live on its own. The device has a door. So, it looks like we have this:
- Device with a Door
- Configurations
We also have a set of configurations. These configurations change the operation of the device but are not necessarily part of the physical device. So, we could model configurations on a class by itself. However, since we know that a device can be either in a test configuration or a production configuration, these actually represent operational states. We also know that certain operations or states of the door might behave differently based on the current configuration. So, there is no need to create a separate configuration class and instead model the configurations as states themselves. If we decide to add another type of configuration later on, it will be easy to add.
We have two major parts: Devices and their configurations. We will model each part with their own class. The Device class will contain a Door class (Device has a door):
Both the Device and Door classes inherit from the DomainObject class. The DomainObject class is a convention that I’ve accustomed to use over the years. A base domain object class contains behaviors and features that are shared across all domain objects. For example, my DomainObject class usually implement a read/write string Name property. This name can also be optionally passed into the constructor. When you model real world things, it is very common that these things have names. So, I end up having a Name property in my base DomainObject class. You will see later how this is used.
Code
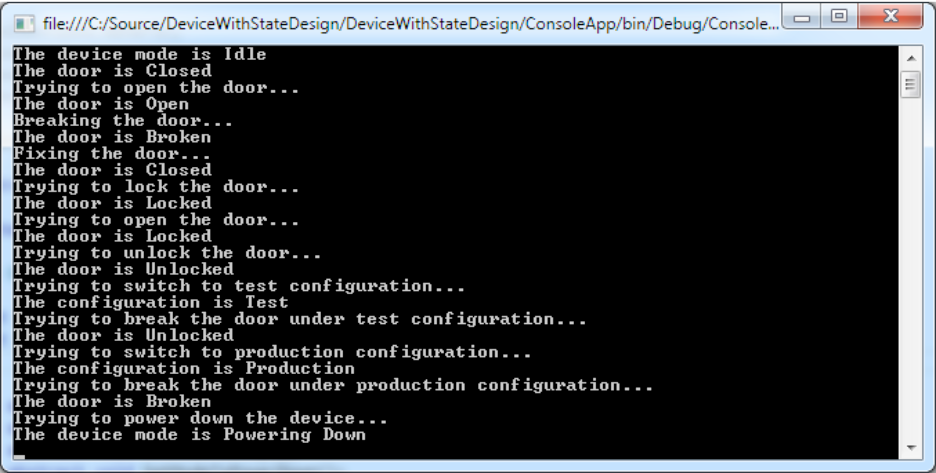
Let’s start writing some code and implement everything. The example we are building is a console application that sets several states to test the Device’s behavior. It will look like this once the output displays on the screen:
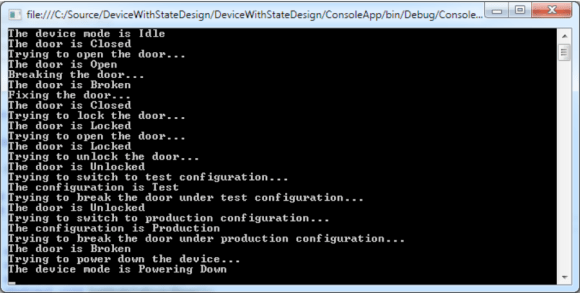
First, lets create the DomainClass, the base class for all domain objects.
</pre>
</pre>
/// <summary>
 /// Base class for domain objects that provides basic
 /// functionality across all objects.
 /// </summary>
 public class DomainObject
 {
 public string Name { get; set; }

public override string ToString()
 {
 return Name;
 }

public DomainObject()
 {
 }

public DomainObject(string name)
 {
 Name = name;
 }
 }
<pre>
The DomainObject class implements a Name property of type string that allows you to conveniently give an object a name since most objects in real life have names. This is the base class for all domain classes.
Next, we implement the Device class. The Device class contains a Door object. In this scenario, the Device class is the context (the owner) to the operations mode and the possible configurations. The operations mode is represented with the ModeState class. The different kind of configuration states are kept track in the ConfigurationState class.
The Initialize() method is used to setup the different kind of states for the current instance of a device. This is the place where the context (the Device) now needs to be aware of what states are actually available. Notice also that within the method we are setting the operations mode to Powering Up and at the end of the method we set it to Idle.
</pre>
/// <summary>
/// The Device class is the owner of the different states
/// that the Device can be in. The Device is alos the
/// owner of actions (methods) that can be applied to the
/// states. In other words, Device is the thing we are
/// trying to manipulate through outside behavior.
/// </summary>
public class Device : DomainObject
{
// Device has a physical door represented by the
// Door class.
private Door _door;
// Device only knows about generic actions on
// certain states. So, we use the base classes of
// these states in order execute these commands.
// The base classes are abstract classes of the
// states.
private ConfigurationState _configurationState;
// The current mode that the device is in.
private ModeState _modeState;
public Device(string name) : base(name)
{
Initialize();
}
public Device()
{
Initialize();
}
private void Initialize()
{
// We are starting up for the first time.
_modeState = new ModePowerUpState(this);
_door = new Door(this);
// The initial configuration setting for the
// device. This initial configuration can come
// from an external configuration file, for
// example.
_configurationState = new ProductionConfigurationState(this);
// The door is initially closed
_door.DoorState = new DoorClosedState(_door);
// We are ready
_modeState.SetModeToIdle();
}
public Door Door
{
get { return _door; }
set { _door = value; }
}
public ConfigurationState Configuration
{
get { return _configurationState; }
set { _configurationState = value; }
}
public ModeState Mode
{
get { return _modeState; }
set { _modeState = value; }
}
}
<pre>
The ModePowerUpState class is one of the ConcreteClass implementations of the State Design Pattern. Let’s take a closer look on how it is implemented.
</pre>
public class ModePowerUpState : ModeState
{
public ModePowerUpState(ModeState modeState)
{
Initialize();
this.Device = modeState.Device;
}
public ModePowerUpState(Device device)
{
Initialize();
this.Device = device;
}
private void Initialize()
{
Name = "Powering Up";
}
public override void SetModeToPowerUp()
{
// We're in powerup state already
}
public override void SetModeToIdle()
{
// Switch to Idle state
this.Device.Mode = new ModeIdleState(this);
}
public override void SetModeToBusy()
{
// Can't set mode to busy, we're still powering up
}
public override void SetModeToPowerDown()
{
// We're busy, but we allow to power down.
// Cleanup any resources and then set the state
this.Device.Mode = new ModePowerDownState(this);
}
}
<pre>
The first thing to notice is that it inherits from the ModeState abstract base class. This would be the abstract base class for all mode states in state design pattern. The following operation modes are possible for this device:
- Powering Up
- Powering Down
- Busy
- Idle
Each of these possible modes are represented as individual ConcreteState classes.
An important fact is that one of the constructors takes an abstract representation of a mode: public ModePowerUpState(ModeState modeState)
This constructor is very important since it will allow the object to set the context (the owner) by using polymorphism. Setting the owner via:
</pre>
this.Device = modeState.Device;
<pre>
allows the pass in different kind of modes and always have access to the context. Once we have access to the context, this instance can now manipulate the Device’s mode. It can also manipulate any other properties or call methods on the Device.
Since the ModePowerUpState class inherits from the abstract ModeState class, it needs to implement all abstract methods that are declared in the ModeState class. The abstract ModeState class declares the the following abstract methods:
</pre>
public abstract void SetModeToPowerUp();

public abstract void SetModeToIdle();

public abstract void SetModeToBusy();

public abstract void SetModeToPowerDown();
<pre>
The ConcreteClass ModePowerUpState only needs to actually implement the methods that would make sense. Here the Idle and PowerDown state would make sense.
Lets look at the states for the Door of the Device. Remember that the door can be in the following states:
- Open
- Closed
- Locked
- Unlocked
- Broken
The abstract State class for the door states looks like this:
</pre>
public abstract class DoorState : DomainObject
{
protected Door _door;
public Door Door
{
get { return _door; }
set { _door = value; }
}
public abstract void Close();
public abstract void Open();
public abstract void Break();
public abstract void Lock();
public abstract void Unlock();
/// <summary>
/// Fix simulates a repair to the Door and resets
/// the initial state of the door to closed.
/// </summary>
public void Fix()
{
_door.DoorState = new DoorClosedState(this);
}
}
The possible states are represented in the abstract methods:
</pre>
public abstract void Close();

public abstract void Open();

public abstract void Break();

public abstract void Lock();

public abstract void Unlock();
<pre>
We can also find a global base method named:
</pre>
public void Fix()
<pre>
This Fix() method is meant to be called by any of the derived ConcreteState classes in order to bring the Door to an initial Closed state (when it has been been fixed after it was broken).
When you download this example source code, you can take a closer look at all files. But, let’s take a look at the more interesting DoorUnlockedState concrete state class:
</pre>
public class DoorUnlockedState : DoorState
{
public DoorUnlockedState(DoorState doorState)
{
Initialize();
this.Door = doorState.Door;
}
public DoorUnlockedState(Door door)
{
Initialize();
this.Door = door;
}
private void Initialize()
{
Name = "Unlocked";
}
public override void Close()
{
// We can't close an already locked door.
}
public override void Open()
{
// Can't open a locked door.
}
public override void Break()
{
// To simulate production vs test configuration
// scenarios, we can't break a door in test
// configuration. So, we need to check the
// Device's ConfigurationState. We also want to
// make sure this is only possible while the
// device is Idle.
//
// Important:
// ==========
// As you can see in the If statement, we can
// now use a combination of different states to
// check business rules and conditions by simply
// combining the existence of certain class
// types. This is allows for super easy
// maintenance as it 100% encapsulates these
// rules in one place (in the Break() method in
// this case).
if ((this.Door.Device.Configuration is ProductionConfigurationState) &&
(this.Door.Device.Mode is ModeIdleState))
{
this.Door.DoorState = new DoorBrokenState(this);
}
}
public override void Lock()
{
this.Door.DoorState = new DoorLockedState(this);
}
public override void Unlock()
{
// We are already unlocked
}
}
Take a close look at the Break() method. This is where it gets interesting and demonstrates the use of more than one set of states that are not related to each other. In this case, the state needs to check that the device is in a certain configuration as well as in a certain operations mode before it can set the door state. In order to access these conditions, the state needs access to both contexts,
Because this scenario only allows to break the door when the device is in a production configuration and the operations mode is idle, both conditions are verified by using the state class definitions:
</pre>
if ((this.Door.Device.Configuration is ProductionConfigurationState) &&
(this.Door.Device.Mode is ModeIdleState))
{
this.Door.DoorState = new DoorBrokenState(this);
}
<pre>
By simply chaining class definitions in your comparisons, you get clean compile time validations when compared to string or similar comparisons. The code is fairly easy to read and to expand upon.
Remember that one of your goals is encapsulation when you use object orientation. You have one central place to maintain your code for a certain state that you need to modify or when you need to create a brand new state.
Conclusion
Using a State Design Pattern over Switch and If statements and over State Machines is a powerful tool that can make your life easier and save your employer time & money. It’s that simple.
You can download the source code here. (https://s3.amazonaws.com/StateDesignPattern/DeviceWithStateDesign.zip)
About the Author
Thomas Jaeger is a Solutions Architect and an industry expert for over 21 years in 7 different industries when it comes to software development in general, cloud-based computing, and iOS development. He is a passionate, fanatic, software designer and creator. He lives against the status quo because, in his opinion, creative and innovative solutions are not created following a linear approach but come, in part, from broad experiences in ones life and from an innovative mind.